
EasyShare, super easy network file and printer sharing
Page created: January 17, 2019
Updated: May 7, 2022
EDIT May 7, 2022:
EasyOS 3.4.8+ has an enhancement to EasyShare, supporting screen
display and control of an Android device on the EasyOS desktop.
This new feature is described toward the bottom of this page.
The Author (Barry Kauler) is the developer of EasyOS, an
experimental Linux distribution. EasyOS was originally using
various applications and utilities for file and printer sharing
over a local network, inherited from Puppy Linux. However, the
Author wanted to go to the "next step" in terms of simplicity.
EasyShare is the result.
This web page is a tutorial, showing how easy EasyShare is to
use.
EasyShare can be found in EasyOS version 0.7.1 or greater,
however, EasyShare underwent a major rewrite for EasyOS 0.9.6 and
greater. Note that versions of EasyOS prior to 0.7.1 have an
earlier effort called QuickSamba, now retired.
OK, now to show you just how easy EasyShare is...
Start EasyShare
It is in the menu, however, for extra convenience, it is placed
on the desktop, labeled "share". Just click on the icon...
![]()
There is one vital requirement, that we have a local network,
with other computers connected to it. Usually this is achieved
with a wi-fi or ethernet router. The Author plans to write a
tutorial on that too, though it is pretty straightforward to setup
-- in the case of an ethernet router, just plug each computer into
the router, and run the web-interface of the router to configure
it for Internet access, etc.
The Author has a couple of routers, see blog posts:
TotoLink N100R: http://bkhome.org/news/201712/toto-link-wifiethernet-routerrepeater.html
TotoLink A2004NS: http://bkhome.org/news/201712/totolink-a2004ns-fast-wirelessethernet-router.html
Anyway, that is a digression. As the Author has a local network,
with three computers connected, he can proceed with the demo. For
the purposes of the demo. one of them, the little Mele PCG35 Apo
mini-pc has been booted with Windows 10. The second computer is a
venerable Acer Aspire laptop, running EasyOS. The third PC, on
which this tutorial is right now being typed, is a HP midi-tower,
also running EasyOS. The Acer laptop has a Brother HL2040 laser
printer connected (via USB).
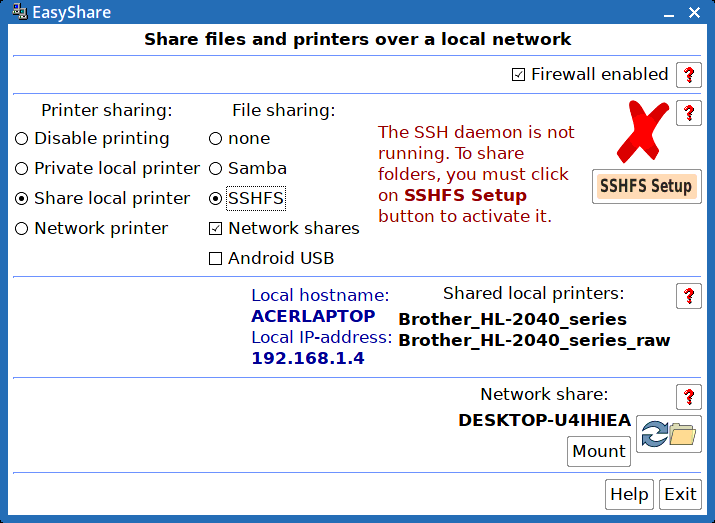
Each of these has a hostname assigned to it:
Mele PCG35: DESKTOP-U41IHIEA (auto-created by Windows, have not
changed it)
Acer laptop: ACERLAPTOP
HP midi-tower: MIDITOWER
Hostname:
Every computer has a name assigned to it, known as the "hostname", and on Windows machines "netbios-name". This is a single word, composed of letters and numbers, and for Windows compatibility it is recommended to use capital letters.
A hostname is automatically generated when EasyOS first starts up, in the format "EASYPCnnnn". It is a good idea to change this to something more meaningful to yourself. In the menu "Setup -> QuickSetup first run settings" you can change the hostname. Some releases also have an entry in the menu "Network" category to set the hostname, and it can also be changed in the "Samba Setup" (described below).
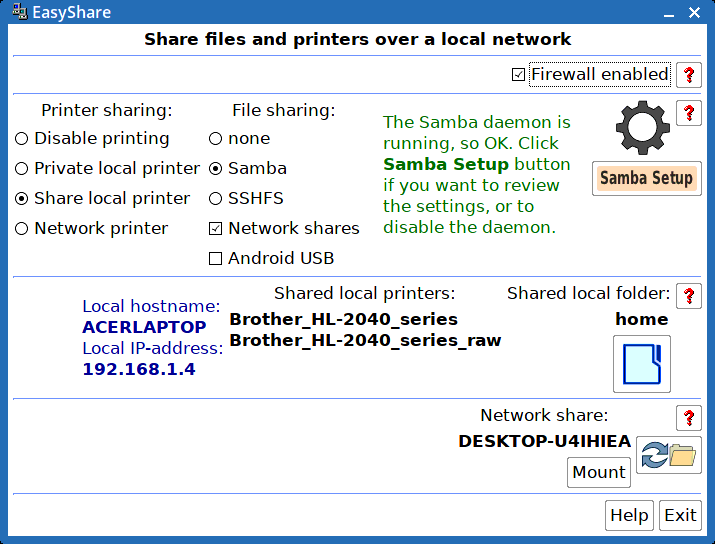
Booting a pristine EasyOS, an ethernet connection is
automatically detected. All that the Author has to do is click the
"share" icon on the desktop...
...that's it, nothing to configure, network shares automatically
discovered!
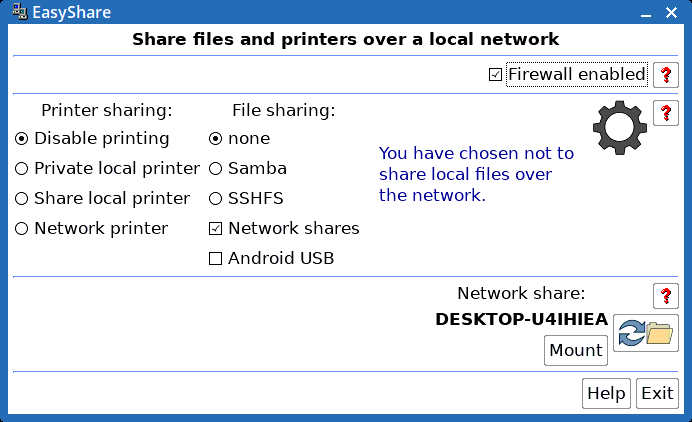
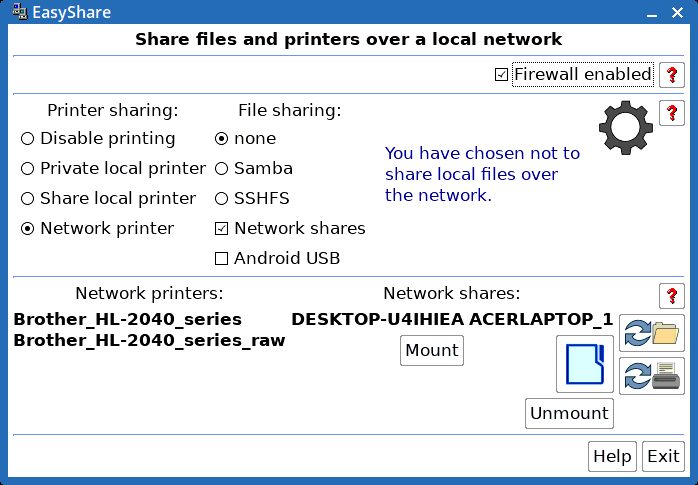
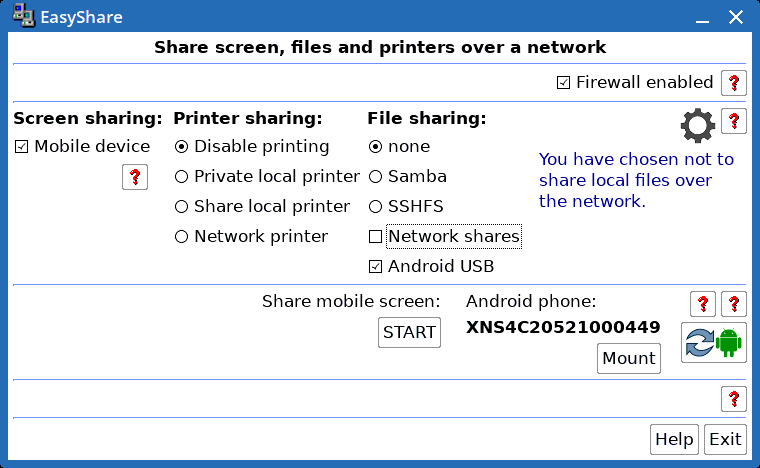
A couple of important points about the above snapshot: the
firewall defaults to enabled, and the checkbox to discover network
shares defaults to ticked.
The Mele mini-PC is running Windows, and has a share, named
"DESKTOP-U4IHIEA", and as you can see, it has been automatically
discovered. If we click on the "Mount" button, the username and
password will be asked for, and we are in business.
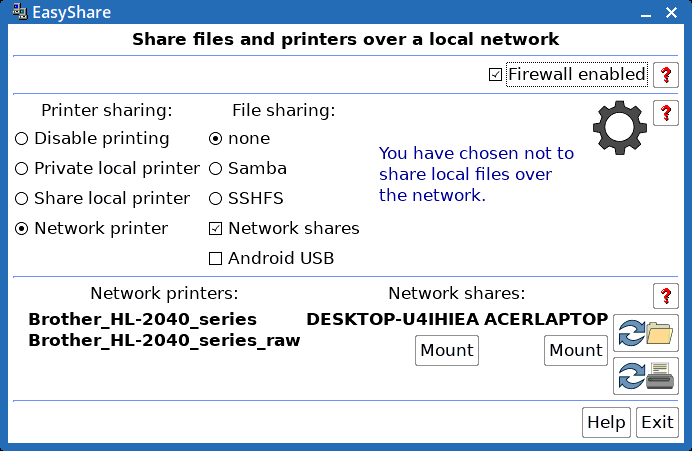
The Acer laptop has a printer connected, and EasyShare is
configured on the laptop to share the printer. To access the
printer from the midi-tower, all that is required is to click the
"Network printer" radiobutton...
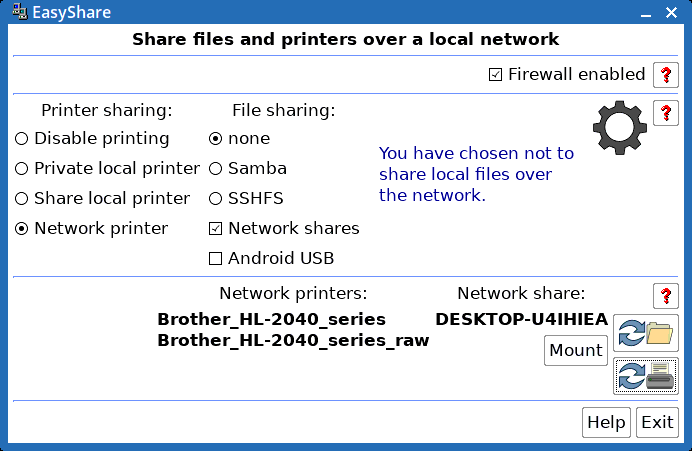
...that's it, printer ready for use. Network printers are
automatically discovered and available from apps just like any
local printer.
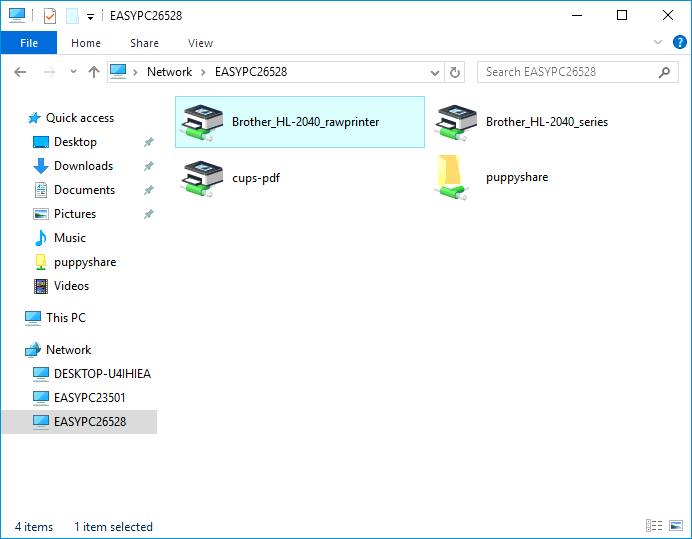
Notice that there are two entries for the Brother HL-2040
printer. The Author used the CUPS setup on the Acer laptop (see
the menu "Setup --> CUPS Printer Wizard") to create two
interfaces to the same printer. The "_raw" one is for printing
from a Windows PC, and it is only required if want to print from
Windows. Printing from another Linux PC, just use the normal
interface, "Brother_HL-20140_series".
Further down on this page there is explanation how the "_raw"
interface is created.
There is really no need for a detailed tutorial, EasyShare is so "easy peasy". However, for someone reading this page online, not yet able to get their hands on EasyShare, the tutorial continues...
Firewall
EasyShare in EasyOS prior to version 0.9.6 required manual
configuration of the firewall. There is a firewall GUI, in the
menu at bottom-left of screen, "Setup -> Firewall Setup
Wizard", which can be run at any time to turn specific ports on
and off. However, this is not needed, as EasyShare does it
automatically.
Technical note:
The firewall configuration can be found at ~/.config/firewall/fw.conf, and you can look at this file to see exactly what ports are open or blocked. EasyShare writes to this file and regenerates the firewall whenever there is a change, such as one of the radiobuttons or checkbox selected.
You can turn off the firewall if you wish, however, it is
recommended to be on for security reasons. All ports other than
those absolutely needed, will be blocked.
Printer sharing
The way that the Author setup a printer to be shared, is first
configured a local printer on the Acer laptop. This is done via
the menu at bottom-left of screen, "Setup -> CUPS Printer
Wizard". This is straightforward, as long as there is a driver for
the printer.
To make this printer available over the network, for other
computers to print-to, is very simple. The above snapshot shows
the printer showing up in the midi-tower PC. On the laptop, the
printer was exported by clicking this radiobutton (on the
laptop)...
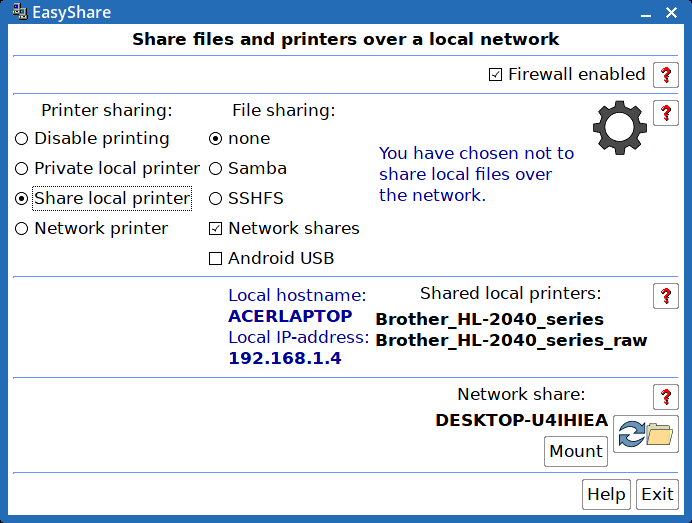
...that's it, done. No manual configuration required.
Repeating, printer sharing does assume that you have already
setup the printer via the menu "Setup -> CUPS printer wizard".
Technical note:
If you have used the CUPS Printer Wizard to setup a local printer, EasyShare will take care of configuring it as private or shared. The web-interface does have some checkboxes for this, however, EasyShare will set or clear them automatically, depending on whether you have chosen "Private local printer" or "Share local printer" (see above snapshot). The way it does this is by grabbing a pre-configured configuration file from /usr/local/EasyShare and copying it to /etc/cups/cupsd.conf (and restarting the cupsd daemon).
As already mentioned above, if you want to be able to print from
a Windows machine, create that extra "_raw" interface. The steps
to do this are given further down this page.
The shared printer will seen seen on other computers as a network
printer.
Technical note:
To understand how CUPS prints to a remote computer, look at file /etc/cups/client.conf (on a remote computer, where EasyShare would have the "Network printer" radiobutton selected). You will see that it contains one line, like this "ServerName 192.168.0.2", where "192.168.0.2" is the IP-address of the computer that has the printer.
A problem with this is that IP-addresses on a local network can change, if served by a DHCP server. EasyOS fixes this automatically by a script /etc/init.d/z-cups-network-fix, that runs at every bootup.
Ok, now for sharing files over the network...
File sharing
Just as easy. Let's say, on the laptop, we want to share a
folder, that can be read-from and written-to by other computers.
You can see below that there is a choice, "Samba" or "SSHFS". The
latter is the best choice if there are no Windows computers on the
network.
Considering Samba first, and further down the page there are
notes on sharing with SSHFS. Click on the "Samba" radiobutton...
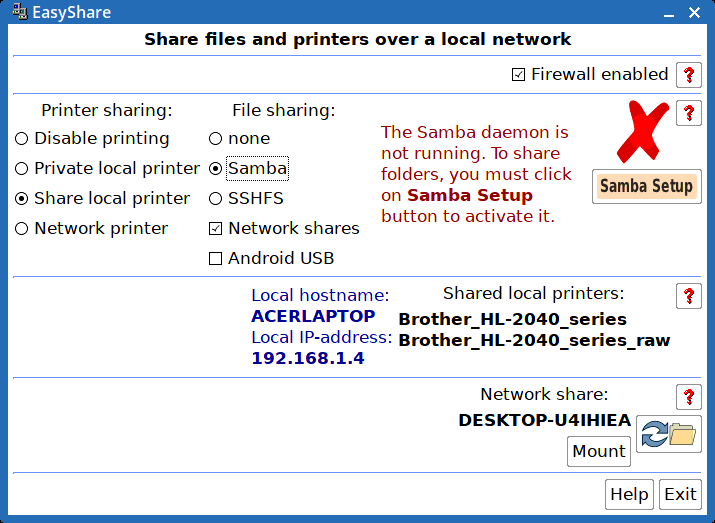
...as you can see, the Samba daemon has to be started, so click
the "Samba Setup" button...
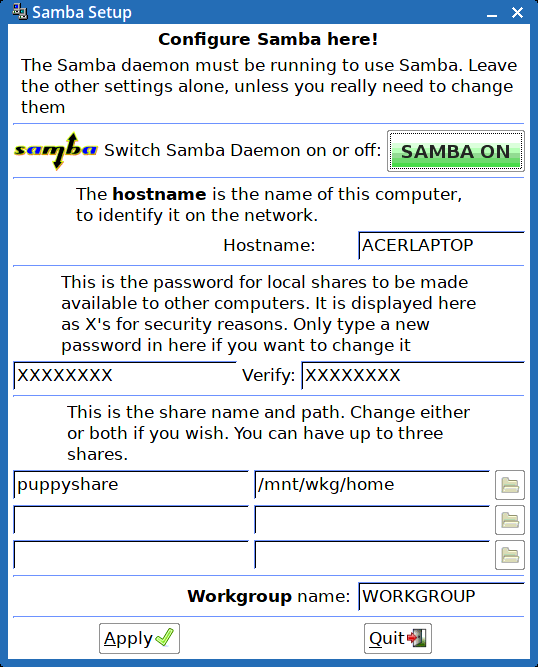
...that "SAMBA ON" green button was already clicked on, prior to
taking the snapshot. The default password is "woofwoof" -- change
the password if you want more security, or it can be done anytime
later.
Leave the other fields as-is. You can change them later, if
required.
There is a technical clarification that needs to be made here.
Forum member 'GCMartin' has emailed some text that is included in
this clarification about Samba usernames and passwords:
Usernames and passwords:
With EasyOS, you are running as the 'root' user, and the password for root is the same as the password that you entered at bootup (to decrypt folders in the working partition). Or, if you did not enter a password at bootup, then the password for root is "woofwoof".
The Samba subsystem maintains its users separate from Easy. Therefore its users can have different names and passwords which are not associated with the main Easy system.
EasyShare has pre-assigned a user named 'root' for you and it has given that root user the password of "woofwoof". This user, root, can be used by any of your LAN systems to gain access to the resources you share via Samba on this Easy PC.
Please remember that this samba 'root' user is independent of Easy. It is the Samba user whose name happens to be root. Also, the Samba password just happens to default to "woofwoof", which you can change in the 'Samba Setup'.
When logging into a Samba share on this PC from a remote PC, you choose user 'root', and use the password as set in the 'Samba Setup'.
In the case of logging into remote non-EasyOS Linux, and Windows, PCs, they will have their own username and password,
That's it, the "home" folder is now shared...
Back over at the midi-tower, if we click the remote-scan refresh
button, there it is...
Now, if we click on the "ACERLAPTOP" "Mount" button, the password
will be asked for...
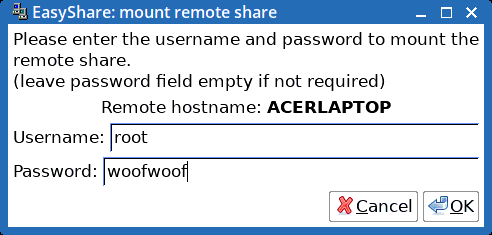
Then we are in business...
The EasyShare window shows the folder as mounted, and we can
click on the "Unmount" button when finished...
...very simple.
Samba notes
SSHFS is the best choice when sharing between Linux computers,
however, when there are Windows computers on the network, it is
best to use Samba. For a mix of Linux and Windows computers,
choose Samba.
Might as well throw in more info about limitations... User and
Group ownerships are not preserved. On the read-only end, they
will all show as root:root, as EasyOS runs as root (that is
another story!). Oh, and symbolic links and hard links are not
preserved either, they show on the read-only end as the files that
they point to.
If you are aware of these limitations, you can live with them. If
you really need to preserve ownership and links, put the files in
a tarball.
Note that Samba Setup was originally created by Michael Amadio (01micko on the Puppy Forum), and has been heavily modified it to work with EasyShare.
Now for something a bit different...
Android phone
EasyShare is evolving, and and support for Android phones and
tablets connected via USB cable has been added on August 13, 2018.
Here is a snapshot:
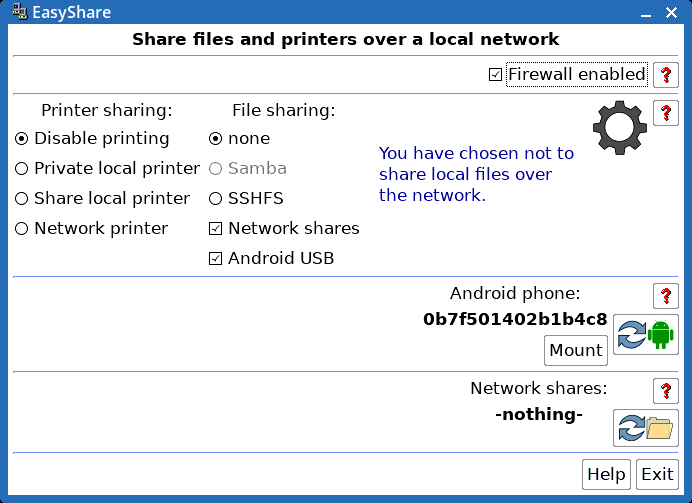
An Android phone can connect over a wifi network, however, the
"old" way with a USB cable is very simple, secure, and requires no
password.
As you can see in the above snapshot, there is a "?" help button,
however, it is very simple. Developer mode must be
turned-on on the phone, and USB-debugging enabled (which
is explained in the "?" help window).
Technical notes:
EasyShare uses adbfs, which is a filesystem for the Android Debug Bridge. The latter is provided by the adb utility. The end result for the user is simplicity: click the "Mount" button and you will get a ROX-Filer window and can read/write the folders and files on the phone. Afterwards, close down with the "Unmount" button.
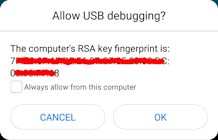
Some extra notes about connecting the USB cable:
| The very first time that you connect the USB
cable between computer and Android device, pay close
attention to the Android screen -- there will be a popup
asking if you want to authorise this connection -- reply in
the affirmative. Also, tick "Always allow from this computer" so that you don't get asked every time the cable is plugged in. |
 |
| Then there will be another popup, asking what
kind of connection you want. You will get this popup every
time that you connect the cable. It varies with different
versions of Android, but this is what you expect the popup
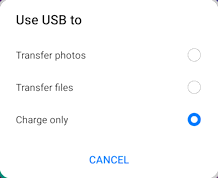
to look like: ...recommend to tap the "Transfer files" radiobutton. |
 |
Note also, If EasyShare is not running, EasyOS has
alternative handlers for those "Transfer photos" and "Transfer
files" radiobuttons. Tap the former, and the "PupCamera" app will
automatically start in EasyOS. Tap the latter, and the "PupMTP"
app will automatically start in EasyOS.
...in theory anyway. Cannot guarantee that those apps will popup
for all Android devices. Anyway, these are alternatives, and are
disabled if EasyShare is running.
As stated, easy-peasy. For sharing with Windows PCs though, is another story! Windows-sharing is a work-in-progress, Here are some notes...
Windows
Note that the photos below were taken when the Author left the
hostnames of the Linux machines at the automatically generated
default. For example "EASYPC26528", which is actually the Acer
laptop, and the Author is now using more meaningful hostnames,
such as "ACERLAPTOP" for the Acer laptop.
There are two separate issues to deal with: file sharing and printer sharing. Considering the former...
File sharing, Linux-Windows
if you have setup Win10 to share over the local network, it will automatically discover what is there...
...see, Win10 has discovered "EASYPC5290" which is the Author's
midi-tower, running EasyOS. If we now open "puppyshare"...
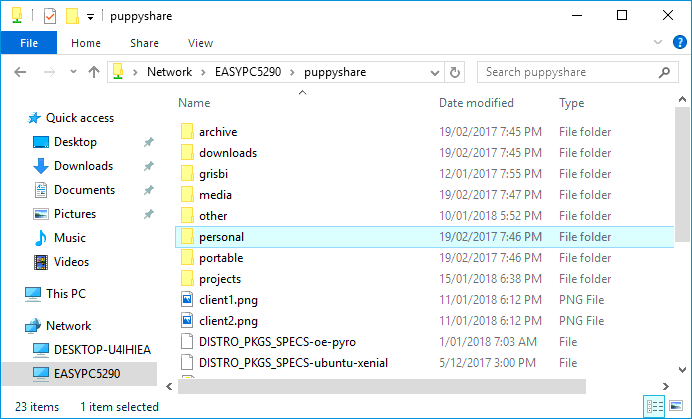
We are in business! Win10 has mounted the folder read-write, so
we have two-way transfers. Do note though, that Windows does not
know about file permissions and ownership, So any file or folder
that you create on the Windows end, will have odd permissions on
the Linux end.
We can also print. In the Author's case the printer is on a Linux machine, and he is able to print to it from his Win10 machine...
Printing, Linux-Windows
To print from a Windows PC to a printer on a Linux PC, a "raw"
printer interface needs to be created. See the second-last photo
above, there are two printer interfaces, for the same printer.
Puppy Forum member 'shinobar' posted instructions on how to
create a CUPS raw printer interface:
http://www.murga-linux.com/puppy/viewtopic.php?p=468516#468516
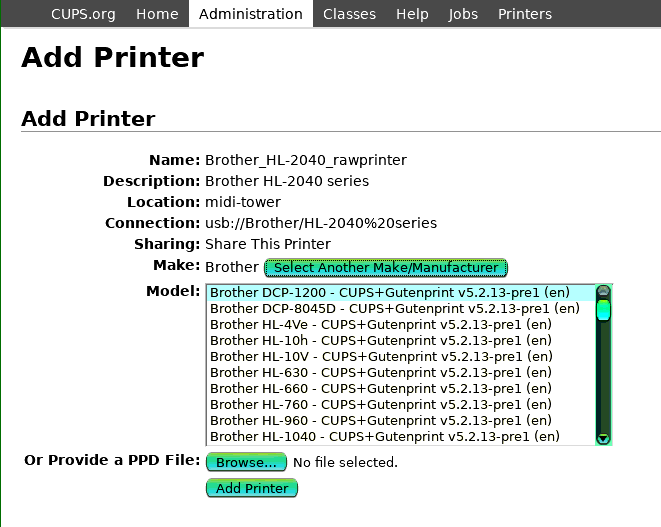
Well, can put some snapshots here too. The Author had already setup CUPS for his "Brother_HL-2040_series" printer, so he added another one and changed the name slightly, to "Brother_HL-2040_rawprinter"...
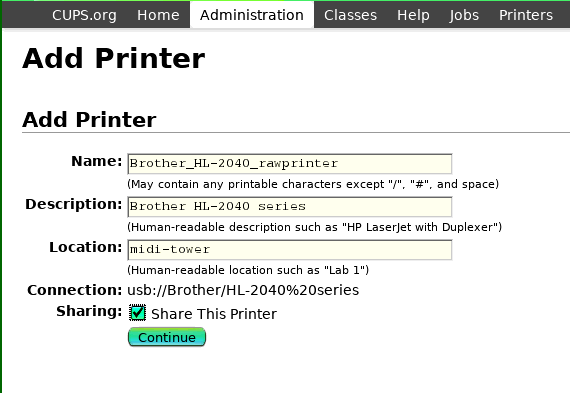
In the next window, instead of selecting the driver for the
Brother printer, the Author clicked "Select Another
Make/Manufacturer" button...
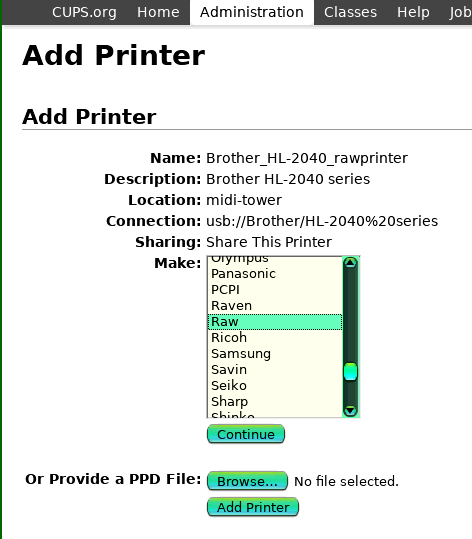
And then chose "Raw"...
Then on the next window, just click "Add Printer" button...
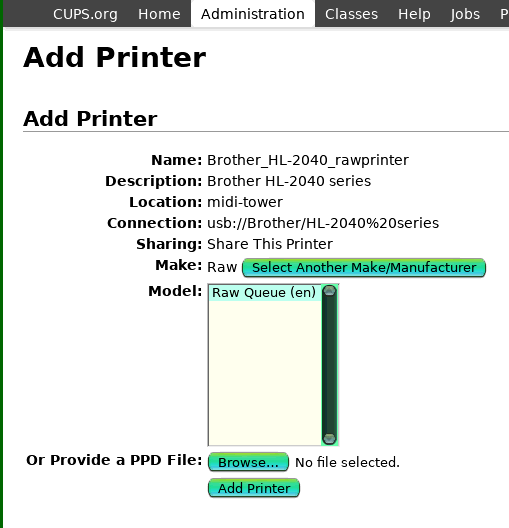
Then you are in business. Over in Win10, if you click on the
printer icon, it will ask you to select a driver, and will
download the (in my case) Brother HL-2040 driver for Win10 -- so
you must have an Internet connection.
Look around, there is a "Print Test Page" button.
SSHFS file sharing
This is a good choice when there are only Linux machines on the
network, more specifically, only EasyOS machines, as it does
require EasyShare to be running on each machine.
Setup is pretty much the same steps as for Samba, but to work
properly, you do need to tick the "SSHFS" radiobutton at both
ends, that is, on all machines on the network. Like this:
And then you will need to click the "SSHFS Setup" button...
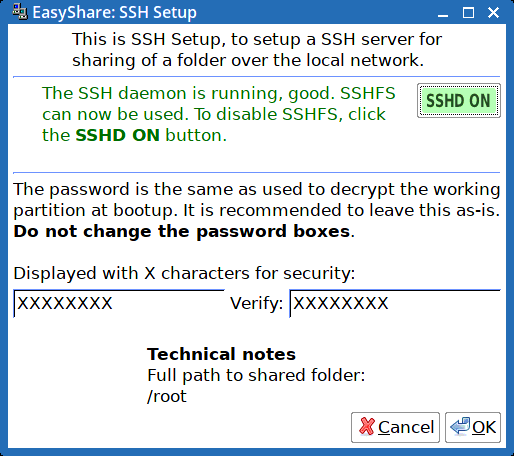
...unlike Samba, which has its own separate password, SSH Setup
uses the 'root' user password, which will be whatever password was
entered at bootup to decrypt folders in the working-partition. If
no password was entered at bootup, the default password for root
is "woofwoof".
When logging in from another computer on the network, you would use username "root" and password whatever is root's password on this machine.
Screen sharing
This is a great new feature of EasyShare, available in EasyOS 3.4.8+. It is a GUI frontend for the 'scrcpy' CLI utility, introduced in this blog post:
https://bkhome.org/news/202204/scrcpy-display-and-control-android-device.html
Here is a snapshot:
...on the left, "Mobile device" checkbox is ticked, to enable screen sharing of an Android device, connected via a USB cable.
Notice also, "Android USB" checkbox is ticked. This enables two-way file transfer between EasyOS and the Android device. Yes, we can have both of these checkboxes ticked at the same time!
There's nothing to it -- tick the checkbox, click the "START" button, and up pops the Android screen.
This is the first release, and the 'scrcpy' utility is started
with the defaults only. However, if you run "scrcpy --help" in a
terminal, you will see that there are many commandline options.
Selection of some of these could be in a future release of
EasyShare.
Post-amble
What the Author wanted for himself is file and printer sharing that can be setup with just a few clicks. Although there is a lot of explanation above, essentially it does resolve down to "just a few clicks".
He can plug a computer into the network, boot a pristine EasyOS, click the "share" icon, and after quite literally a few clicks have sharing of files and printer. Awesome!
Furthermore, settings are remembered for future bootups. Awesome again!
(c) Copyright Barry Kauler, December 2018, 2022, all reproduction rights reserved.
Disclaimer: Barry Kauler has provided these instructions in good faith, however there is a disclaimer of all responsibility if something does go wrong.
Tags: apps