
Easy frugal installation
Original document: March 13, 2019, updated
Nov. 24, 2020, Jan. 19, 2021, Apr. 24, 2022
Completely rewritten August 4, 2022. Updated: Nov. 22, 2023.
Minor update: July 10, 2024
This page written for EasyOS 4.2.2 or later.
Overview
EasyOS is downloaded as an image file for a USB-stick, that you can boot on your PC. This will get you up and running with EasyOS; however, you might then want to install Easy to the hard drive in the computer. That is what this page is about.
This page focuses on older BIOS-firmware computers, not UEFI-firmware computers. The latter is all Windows computers manufactured after 2012.
There is another page that focuses on installing to a UEFI computer:
https://easyos.org/install/how-to-install-easyos-on-your-hard-drive.html
This page is a twin of that UEFI-install page, just with some
changes relevant to differences in the older legacy-BIOS
computers.
So, if you do have a legacy-BIOS computer, read on. Well, even if you have a UEFI computer, read this page; it has useful information applicable to both BIOS types...
Think about where to install
The procedure to install depends on what is already installed in the computer. EasyOS requires a partition with ext4 filesystem. If there is one already, that's great, it doesn't matter what it is being used for (such as another Linux distribution), EasyOS will happily co-exist as only requires one folder in that partition.
If the computer only has Windows, then likely there will only be
vfat and ntfs partitions. In that case, you will have to shrink
one of the partitions to create empty space in the drive, in which
an ext4 partition can be created.
If that is your situation, please go over to the "twin" page,
which explains how to do that:
If your computer has Windows, but also a separate drive, you could create a ext4 partition on that. Or, if you don't need that drive for anything else, install EasyOS to the entire drive, as explained here:
https://easyos.org/install/how-to-install-easyos-on-a-new-ssd.html
...well, if you go for that option, you are fully installed, ready-to-go, no need to read any further on this page.
So, you have an ext4 partition, next step is to install EasyOS to it...
Install to ext4 partition
Installation is incredibly simple. You just need to create a folder in the ext4 partition, and copy three files, 'vmlinuz', 'initrd' and 'easy.sfs' into that folder. Those files are inside the 'easy-<version>-amd64.img' file.
Which raises the question, how do you open up that image file and
extract those files?
If you go to this page, various ways of opening up the image file
are explained:
https://easyos.org/user/how-to-update-easyos.html#Manual_updating
You can do it while running any Linux distribution; however, with EasyOS it is extremely simple, just click on the image file.
So, you might find it will make life easier to write the image file to a USB-stick and boot that. That is also easy, explained here:
https://easyos.org/install/how-to-install-easyos-on-a-new-ssd.html
You have got access to those three files, either by opening up the image-file or by writing the image-file to a USB-stick. The image-file consists of two partitions, like this:
| Gap 1MiB |
Boot-partition 7miB fat12 |
Working-partition 816MiB ext4 |
Here they are, mounted, firstly the vfat partition:
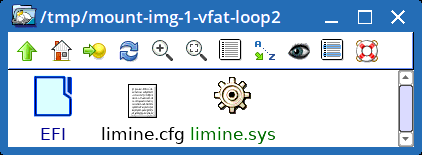
Secondly, the ext4 partition:
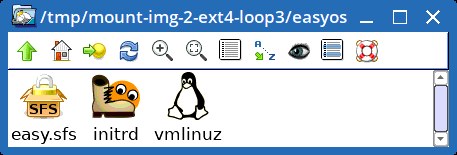
To install EasyOS to the ext4 partition on the computer internal drive, copy those three files 'vmlinuz', 'initrd' and 'easy.sfs' across.
In the ext4 partition of the internal drive, create a folder, say "easyos", or, you could go deeper, say "easyos/dunfell", then copy those files into it.
Hey presto, EasyOS is installed!
Yes, that is all there is to it. EasyOS is installed in what we call "frugal mode", which only occupies one folder in the partition. Thus, the rest of the partition is available for anything else.
There is one remaining vital detail, you need to figure out how
to boot Easy. This is the tricky part. A bootloader is required,
such as GRUB, GRUB4DOS, or Limine. If one of these is already
installed, good, you can just add EasyOS to its menu. Otherwise,
you will have to install a bootloader.
Firstly, considering the situation where GRUB or GRUB4DOS is already installed...
Add menu entry to GRUB
Firstly considering GRUB4DOS. Where it is installed, you will find a file 'menu.lst'. Insert something like this:
title EasyOS Dunfell (partition sda3 folder easyos)
  find --set-root uuid () 054a04b8-0f00-11ed-aeb9-287fcfeb4376
  kernel /easyos/vmlinuz rw wkg_uuid=054a04b8-0f00-11ed-aeb9-287fcfeb4376 wkg_dir=easyos
  initrd /easyos/initrd
That UUID value can be found by running the 'blkid' utility, for the example of EasyOS installed in partition /dev/sda3, with partition-label "easy2":
# blkid /dev/sda3
/dev/sdb2: LABEL="easy2" UUID="054a04b8-0f00-11ed-aeb9-287fcfeb4376" BLOCK_SIZE="4096" TYPE="ext4" PARTUUID="a3976784-02"
Considering GRUB2, the Author has no experience; however, gleaned from what others have done, the /etc/grub.d/40_custom file will need something like this inserted:
menuentry "EasyOS Dunfell (partition sda3, folder easyos)" {
insmod ext2
insmod search_fs_uuid
search --no-floppy --fs-uuid --set=root 054a04b8-0f00-11ed-aeb9-287fcfeb4376
linux /easyos/vmlinuz rw wkg_uuid=054a04b8-0f00-11ed-aeb9-287fcfeb4376 wkg_dir=easyos
initrd /easyos/initrd
}
Apparently, GRUB2 then needs to be updated, like this:
# update-grub
or, depending on your distribution:
# grub2-mkconfig -o /boot/grub2/grub.cfg
A clarification about those two parameters wkg_uuid and wkg_dir...
Clarification:
wkg_uuid and wkg_dir are not required by GRUB. They are kernel boot parameters and are read by the 'initrd' file, to tell it where EasyOS is installed. That is, they tell the 'initrd' in what partition and what folder 'easy.sfs' is located (and also where 'initrd' and 'vmlinuz' are located). It might seem redundant, since that information is already provided in the GRUB menu entry; however, the 'initrd' has to be told separately.
Something else that is useful to know: instead of wkg_uuid, you
could use "wkg_label" or "wkg_dev", which for the above example
would be "wkg_label=easy2" or "wkg_dev=sda3". However, you would
need to be certain the filesystem label is unique. Also, for
wkg_dev, you would need to be certain that the partition device
name doesn't change; for removable drives, the device name is
likely to change.
There is something to be aware of if using old GRUB bootloaders...
Problem with old GRUB versions:
GRUB v1, GRUB4DOS, and GRUB v2 prior to version 2.0.4 (released 2019), do not recognise an ext4 filesystem if it has modern features such as the "encrypt" feature turned on. You can still use them; however, the feature of EasyOS to encrypt some folders in the working-partition will not be available. Folder encryption is a security protection if someone steals your computer, or whatever media EasyOS is installed on. You will have to forego that extra protection.
What you might want to consider, if you have one of those old
GRUB bootloaders installed, to replace with either a modern GRUB
v2, or the Limine bootloader.
Limine bootloader is the "official" bootloader for EasyOS, and is available in all releases of Easy from 4.2.2 onward...
Install Limine bootloader
EasyOS has Limine bootloader installed, and "Limine Installer", a GUI frontend, found in the "Setup" category of the menu. The GUI installer is a great tool, so it is highly recommended to bootup EasyOS on a USB-stick so that you can run it.
Won't clutter up this page with details. Sufficient to say that you run the Installer and it will walk you through installing Limine, for either UEFI or BIOS computer.
It will supplant any previously-installed GRUB or GRUB4DOS, but Limine supports reverting the install, restoring the previous bootloader, if any.
Before going any further, note some limitations and a
disclaimer...
Limitations of Limine:
Limine only recognizes partitions with fat12/16/32 and ext2/3/4 filesystems. Any Linux distribution would need to have its 'vmlinuz' and 'initrd' in one of those filesystems. The Limine Installer can discover all installed Linux distributions in the internal drives and create menu entries for them; however, an example that will not be found is Fedora that is usually installed in a brtfs filesystem. Even if a distribution is in one of the filesystems that Limine understands, it is possible that the Limine Installer might not find it.
Disclaimer:
The Limine Installer is a work-in-progress and is not guaranteed to be 100% as you would like it to be. The comment above that Limine is able to revert an installation and go back to GRUB, is currently unproved; you might want to read the documentation and issues sections on the Limine github site.
Mini-tutorials have been written on BarryK's Blog, see here for a short introduction to Limine and links to the mini-tutorials:
https://easyos.org/install/limine-bootloader.html
After Limine has been installed, hold down the "hot key" at power-on to run the BIOS-Setup, and choose the internal drive to which Limine is installed. Which will probably be the default anyway. Limine will run and offer a menu of all operating systems found on the computer. Here is an example:
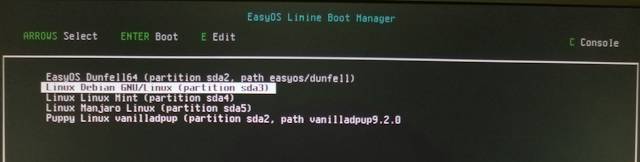
...if the computer had Windows, that would also be in the menu.
Postamble
Although the focus of this page is install to legacy-BIOS computers, most of it also applies to UEFI computers. But, recommended to also read that other "twin" page for some UEFI-specific details.
A disclaimer: Barry Kauler has provided these instructions in good faith, however there is a disclaimer of all responsibility if something does go wrong. If you are a Linux newbie and want to install EasyOS on the internal hard drive, it is recommended that you find a Linux-knowledgeable guy to help.
Tags: install