
How to install EasyOS on a new SSD
Page originally written March 13, 2019
Completely rewritten June 29, 2022, for
EasyOS version 4.2.2 or later
Updated: July 2, 2022; December 31, 2022; June 16, 2023
Updated: June 28, 2023; April 12, 2026
This page describes how to install EasyOS on an entire drive,
completely replacing what was on it before. This can be any drive;
SSD or magnetic-platter HDD, internal or external. Also USB
flash-sticks or SD-cards.
The original case study was install to a SSD in a Mele PCG35 Apo
mini-PC, but these instructions apply to any computer with x86_64
CPU. Any amount of RAM, from 2GB upwards, and a video card with at
least 800x600 pixels resolution (1024x768 minimum is better). And,
as stated above, any drive, not just an SSD.
Also, any age PC, from very recent, right back to PCs with early
x86 64-bit CPUs (earliest supported is the "nocona" CPU). If it
has the ISA or EISA card interface, not PCI or PCIe, then it is
too old.
It needs to be stated up-front, that installing EasyOS onto an
entire drive is an extremely simple operation. Basically, you
download the latest release, write it to the drive, then set the
BIOS-Setup or UEFI-Setup to boot from the drive. There may be some
extra details that you will need to consider, but that is the
essence of it, "easy peasy".
The original case study
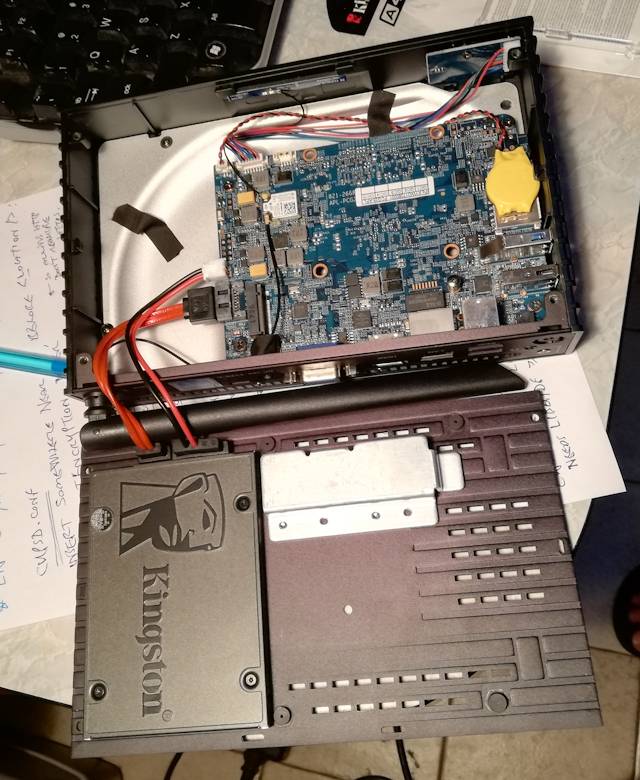
Back in 2019, the author of this page (Barry Kauler), bought a
240GB 2.5inch SATA Kingston SSD, and installed it in the Mele. An
easy operation. Snapshot:
The Mele has Windows 10. Which raises the question, how to
download the latest EasyOS and write it to the Kingston SSD? While
running Windows? Or bootup EasyOS or some other Linux from a
USB-stick?
Either will be OK.
Download and write EasyOS to a drive
The release of EasyOS, when this page was originally written, was
the Dunfell-series. Water under the bridge; the most recent edit
of this page, up to the Excalibur-series. Download from here:
https://distro.ibiblio.org/easyos/amd64/releases/excalibur/
Let's say that it is 'easy-7.2.4-amd64.img'. You will also see an
'md5sum.txt' file, grab that too. It is important to verify the
download file has not been corrupted. In Linux, you can do this:
# md5sum easy-7.2.4-amd64.img
...that will return a checksum, that you can compare with what is
in 'md5sum.txt'.
If you are running Windows, there is an 'md5sum.exe', available
from various sites, for example, here:
http://www.pc-tools.net/win32/md5sums/
To write the file to the drive, in Linux you will need to know
its drive name, and be sure that it isn't mounted. Let's say that
you identify the drive as /dev/sdc, do this as the root user:
# dd if=easy-7.2.4-amd64.img of=/dev/sdc bs=1M
# sync
...don't forget that "sync" to flush everything to the drive.
And, be absolutely sure that /dev/sdc is the correct drive.
/dev/sda is most likely your primary drive, and you definitely
don't want to over-write that!
Another point for newbies, is write to the entire drive, in this
example /dev/sdc, not to a partition, which will have a
number, like /dev/sdc1
Any extra note: if you bootup EasyOS on a flash-stick, you will have available "EasyDD", which is a frontend for 'dd' -- it is in the "Setup" category of the menu. Read more about EasyDD here:
https://easyos.org/install/how-to-write-easyos-to-a-flash-drive.html#EasyDD_frontend_for_dd
...that page has a download link for EasyDD and it can be run on
any Linux distribution, not just EasyOS.
If running Windows, you will need to install an app that writes
an image file to a drive. This is not a CD/DVD burner app!
-- though some apps might do both. Here are a few of them:
| Win32 Disk Imager |
https://win32diskimager.org/ |
| USB Image Tool |
https://www.alexpage.de/usb-image-tool/ |
| Etcher |
https://www.balena.io/etcher/
|
| DMG Editor |
https://www.uubyte.com/dmg-editor.html |
EDIT June 28, 2023:
We are no longer recommending Balena Etcher. Reasons given here.
The Author has only personally used "USB Image Tool". "Etcher" used to be recommended by the Raspberry Pi people, but in recent documentation they are recommending "DMG Editor". USB Image Tool usage is described here:
https://easyos.org/install/how-to-write-easyos-to-a-flash-drive.html#USB_Image_Tool
In Windows, if writing to an external drive, you will find in the
tray an option to flush all buffers to the drive, to make it safe
to remove.
That's it EasyOS is installed. In the drive, you will find two
partitions, a 63MiB fat16, and an approximately 1GiB ext4
partition. The former has the Limine bootloader, so that is the
boot-partition and will handle booting on either legacy-BIOS or
UEFI computers. The ext4 partition will get expanded to fill the
drive at first bootup -- so you can have any size drive, up to
2TB.
The only remaining task is to get your computer to boot from the new drive...
Precaution
Before explaining how to boot the new drive, a digression. This section is added as someone hit this problem, and became very confused.
As stated above, there are two partitions, a vfat boot-partition and ext4 working-partition. The former contains the Limine boot-loader and the latter is where EasyOS is installed.
The boot-partition contains file 'limine.conf', which contains text, including a line like this:
kernel_cmdline: rw wkg_uuid=1ca8506e-79f5-11ed-b964-287fcfeb4376 wkg_dir=easyos
This tells the Linux kernel what partition and the folder where
EasyOS is installed.
What the person had done was boot EasyOS from a USB-stick, then dd the image-file to the internal drive. The exact same version as booted on the USB-stick. He then tried to boot the installed EasyOS, while leaving the USB-stick plugged in.
This caused the Limine boot-loader to be confused, as it saw two partitions with the same UUID, and bootup failed.
If you are new to all of this, don't worry about the technical
details. Just recognize the problem that has occurred, and the
simple fix...
Solution: power-off, remove the
USB-stick, then bootup Easy on the internal drive.
So the precaution is, avoid a situation where there are two partitions with the same filesystem UUID. Also good to avoid partitions with the same filesystem label.
A further digression, without wanting to add too much verbiage to this page; if you are running a Linux distribution, you can see the UUID and label of any partition, and change if desired. For example, say that the working-partition of the internal drive is sdb2:
# blkid /dev/sdb2
/dev/sdb2: LABEL="easy2" UUID="1ca8506e-79f5-11ed-b964-287fcfeb4376" BLOCK_SIZE="4096" TYPE="ext4" PARTUUID="35e141c5-02"
This will change the UUID to a random value:
# tune2fs -U time /dev/sdb2
...and you will then have to edit 'limine.conf' with the new UUID
value. Anyway, this is very much a "corner case".
Just one extra note: there are two alternatives to "wkg_uuid" on the kernel commandline; "wkg_dev" or "wkg_label". These are explained on this page:
https://easyos.org/dev/guidelines-for-debugging-easyos.html
Back onto booting Easy...
Configure to bootup EasyOS
There are a lot of decisions to be made here, depending on your situation. That's a rather vague statement, but what it boils down to, is you have to tell the BIOS-Setup or UEFI-Setup to boot EasyOS, or make an entry in an existing boot manager, such as GRUB, to boot EasyOS, or install a boot manager.
The above paragraph might seem complicated, but for the case study of this page, we already have a boot-loader installed; Limine. The only thing remaining is to configure the BIOS-Setup or UEFI-Setup to boot it.
Which is pretty easy to do. Before explaining that though, another digression...
The page linked here has extra very useful information.
Especially please read it if the computer has Windows installed:
...it explains certain precautions need to be taken to ensure
Windows does not become corrupted in a dual-booting setup.
Anyway, the very simple procedure to get the computer to bootup
EasyOS...
You can configure the BIOS-Setup or UEFI-Setup to boot EasyOS. You need to know the hot-key that you hold down after power-on of the computer, usually "DEL", "ESC", or "F12", and you will find a text-mode interface where you can choose to boot EasyOS.
Note, most PCs have two different hot-keys. One of them brings up
a boot-menu, the other brings up the BIOS-Setup or UEFI-Setup. The
boot-menu is a once-only choice, it doesn't alter the BIOS/UEFI
firmware flash memory. That's OK for a quick test, but if you want
to make the new boot-choice permanent then you will need to go
into the BIOS/UEFI Setup.
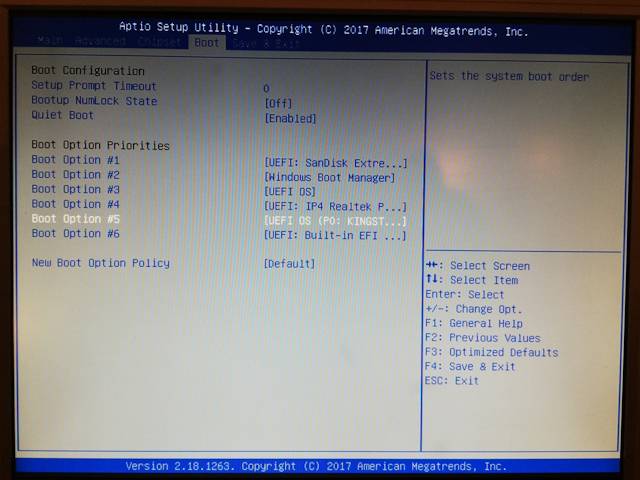
...notice, the "SanDisk Extreme" drive is at the top. That is a
USB-stick, that the Author booted EasyOS from in the original
case-study. The Kingston SSD is down at #5, and it has to be moved
up to #1. Note, #3, "[UEFI OS]", is a fat32 esp partition that the
Author created for earlier installation experiments -- just ignore
that.
So, you choose the Kingston SSD, and off you go, the Limine menu
will display for several seconds, then EasyOS will startup and you
have a desktop:

...that's the old Dunfell-series desktop!
You can leave EasyOS as the default choice in the BIOS-Setup or
UEFI-Setup; however, there is something interesting to think
about...
In the new drive, the Kingston SSD in the original case study,
you will see two partitions; as already mentioned, 63MiB fat16
boot-partition and a second ext4 partition that has the
installation of EasyOS.
That boot-partition has the Limine bootloader, and it has a menu,
file 'limine.conf', to which you can add more entries. You could
make entries for other operating systems installed on the
computer, including Windows.
Barry has posted how to add Windows 10 to the Limine menu, at his
blog:
https://bkhome.org/news/202207/how-to-add-windows-to-the-limine-boot-menu.html
...note, that page has the old Limine syntax, and file 'limine.cfg'. Limine changed to a slightly different syntax and the file name changed to 'limine.conf'. You can read about the new syntax here:
https://github.com/Limine-Bootloader/Limine/blob/v11.x/CONFIG.md
Also, Barry wrote a script to convert the old syntax to the new one:
https://bkhome.org/news/202602/script-convert-liminecfg-to-limineconf.html
Note also, Limine dropped support for ext4, only recognizes vfat partitions; however, Barry maintains a patch that restores ext4 support:
https://bkhome.org/news/202602/limine-1070-patched-to-support-ext4.html
So, from the Limine menu, you could choose to boot a different OS, if the fancy takes you.
Note also, EasyOS has "Limine Installer", in the "Setup" menu,
that can be used to discover all of the installed OSs and
automatically create a 'limine.conf'. You could use this to add
extra OSs to the existing 'limine.conf' file.
Conclusions
You should find the steps described on this page to be pretty
straightforward, fun, and, we expect, very rewarding.
Of course, writing an image to a drive is something that you must
take responsibility for. If you accidentally overwrite the main
drive, that is your fault! These instructions are given with that
understanding.
One very good thing about the method described above, of going
into the BIOS-Setup or UEFI-Setup and choosing the new drive, is
that it does not alter the main drive at all. You could simply
remove the new drive, and go back to how everything was before.
Anyway, enjoy!
Oh, and do be sure to monitor Barry's Blog, to find out about new
developments and releases:
Tags: install