
How to install EasyOS on your hard drive
Originally written March 17, 2019, updates
March 19, 2020, April 24, 2022
Completely rewritten August 3, 2022. Partial update September 1,
2024
Updated: April 14, 2026
Overview
At the time of writing, EasyOS does not have an "GUI installer", as do mainstream Linux OS's. There is one planned; however, it is actually quite easy to do manually, unlike mainstream OS's. There is definite benefit of doing it yourself, instead of being at the mercy of an automatic or semi-automatic installer.
There are two steps to installation; firstly the actual installation, and secondly installing or configuring a bootloader.
Installation requires that you have a ext4 partition. If the computer only has Windows, then you will have to either reduce the size of an existing partition and create a new ext4 partition, or, if a Linux distribution is already installed, then likely it is in a ext4 partition and you can use that -- EasyOS can happily co-exist with whatever is already in the partition.
Or, if your PC has a separate drive, then you won't need to mess
around with re-partitioning the Windows drive. That is certainly
the simplest and least invasive way to go.
In that ext4 partition, you create a folder, and maybe a subfolder, for example "easyos/excalibur" (where "excalibur" is the name of the current series of easyOS). Then you copy three files extracted from the downloaded EasyOS image file, 'vmlinuz', 'initrd' and 'easy.sfs', to that folder.
That's it, you have installed EasyOS!
What remains is to configure or install a bootloader. Exactly how you do that depends on whether your computer has BIOS-firmware or UEFI-firmware. The latter is all PCs manufactured after 2012.
This page focuses on UEFI computers. For a tutorial that focuses on BIOS computers, look here:
https://easyos.org/install/easy-frugal-installation.html
It was mentioned above, that it is simpler if you have a separate drive to install EasyOS, so considering that first...
Installing to a separate drive
If you can set aside the entire drive for EasyOS, installation, including install and setup of a bootloader, it is so incredibly simple. A separate page has been written explaining this scenario:
https://easyos.org/install/how-to-install-easyos-on-a-new-ssd.html
That page explains how you can simply write the EasyOS image file
to the entire drive, but you could do it manually. Manual install
is good if the the separate drive is already partitioned and in
use for something, such as extra storage space, or another Linux
distribution is installed.
You could manually create a vfat esp partition and a ext4 working-partition, then copy-in the three files 'vmlinuz', 'initrd' and 'easy.sfs' to the latter. And create /EFI/BOOT/BOOTX64.EFI in the esp partition.
Then press the hot-key at power-on to launch UEFI-Setup, and choose the drive with EasyOS.
That's it, at power-on, EasyOS will bootup, but 'BOOTX64.EFI' will expect a configuration file -- read further down this page to see how to create a boot menu with 'limine.conf'.
Or, if GRUB bootloader is already installed, a menu entry can be added to boot EasyOS.
Limine is the "officially supported" bootloader in EasyOS, and there is a GUI, "Limine Installer", that is in the "Setup" menu. Limine is explained further down this page.
Another choice of bootloader is rEFInd, also described at the
bottom of this page.
Installing to a shared drive
If the drive already has a Linux distribution installed, that will likely already have created a ext4 partition; that's great, you can forge ahead and install the three files.
Some mainstream Linux distributions install in a btrfs partition. Unfortunately, EasyOS will not (yet) work in a btrfs partition. So, you will still need to repartition the drive and create a new ext4 partition.
If the drive only has Windows installed, then there will be two or more partitions, with vfat and ntfs filesystems, and you will need to go through the process of shrinking the main ntfs partition and create a ext4 partition in the freed space.
A choice needs to be made whether to also create another vfat esp partition. There is already a vfat esp partition to boot Windows -- in Windows parlance, this is known as the "system partition". You can use that, with a bootloader menu to choose whether to boot Windows or EasyOS.
However, it is a neater solution to create a separate vfat esp partition, so that is what is described below.
Before proceeding though, you need to be sure that the drive is big enough to be repartitioned. Some old Windows 10 computers have only a 32GB drive -- if you reduce the size of the ntfs partition, there won't be enough room for Windows to perform updates. A 64GB drive should be ok, but even then, it might be better not to repartition; hmmm, better not repartition if the drive is any less than 128GB.
If you cannot repartition the Windows drive, or don't want to, go for the separate-drive install, as described above.
If you do want to repartition, read on...
Shrinking a partition in Windows
EasyOS has a great partitioning tool, named GParted, found in the "Filesystem" menu. Unfortunately, you cannot use it to shrink the ntfs partition. Partition shrinkage, to create empty space in the drive, has to be done in Windows, using Windows own repartitoning tool, called "Windows Disk Manager". If you do it with GParted, next time that you boot Windows, then Windows will think something is wrong with the drive.
However, you can use GParted later. Running Windows, use Windows Disk Manager to reduce the main ntfs partition and create some empty space in the drive. Then boot EasyOS from a USB-stick and run GParted, and in that empty space create a small vfat esp partition and a ext4 partition.
How big should that empty space be? If it is a tight squeeze, say in a 64GB drive, 8GB will be OK, but only just. For a bigger drive, say 512GB, make that a more useful size, say 64GB.
So as not to clog up this page with too much detail, how to run Windows Disk Manager is describe elsewhere:
https://easyos.org/install/prepare-your-computer-for-booting-linux.html
Now to create a vfat esp partition and a ext4 partition in that empty space...
Creating partitions with GParted
GParted is in EasyOS, so you have to write the EasyOS image file to a USB-stick and then boot that on the computer. The steps to do that are pretty simple, see how-to here:
https://easyos.org/install/how-to-install-easyos-on-a-new-ssd.html
In a nutshell: after writing EasyOS to the USB-stick, you press
the hot-key at power-on and choose the USB-stick, and EasyOS will
boot.
Now run GParted....
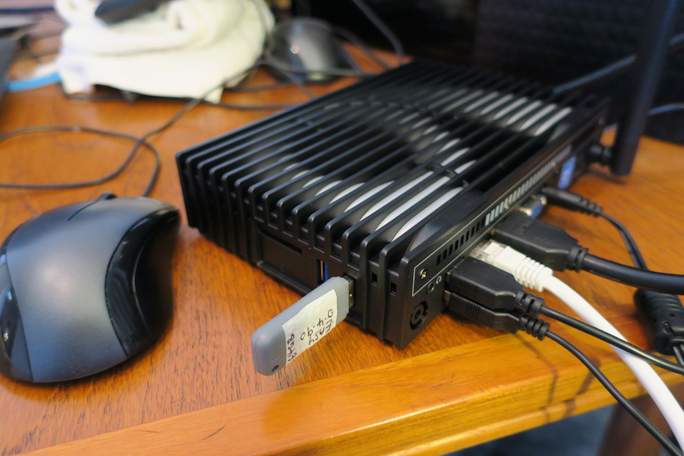
In one case-study in 2019, the author performed this drive repartition on a Mele PCG35 Apo mini-PC. Here is a photo, showing the USB-stick plugged in:
Start GParted from the menu (look under "System" category), and first-up there is a wrapper-window, which asks which drive you want to work on:
Menu "System"
    choose "GParted partition manager"
        choose "mmcblk0"
In the Mele, the internal drive is type eMMC flash-memory, named
"mmcblk0", and partitions are named "mmcblk0p1", "mmcblk0p2",
"mmcblkop3" and "mmcblk0p4". This is Linux naming, and the Windows
C: partition is actually "mmcblk0p3".
After GParted starts, this is what you will see, for the Mele case-study:
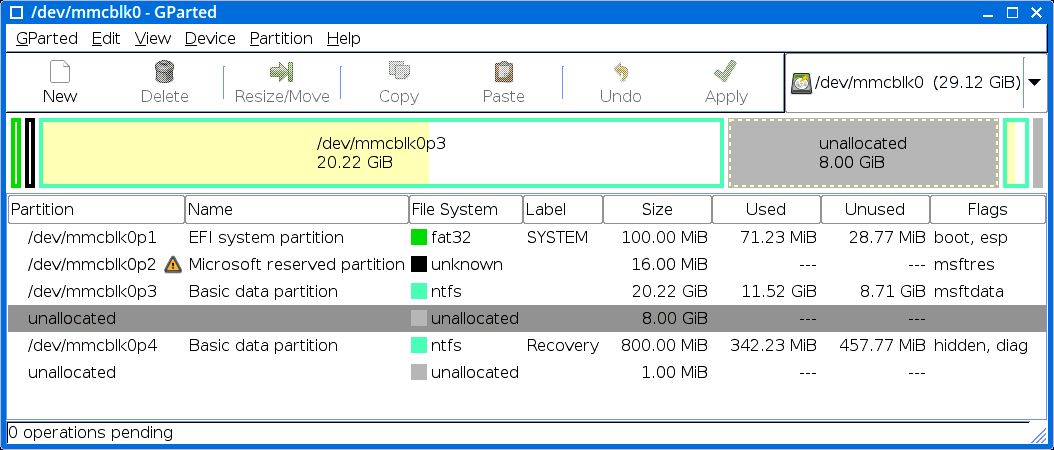
...you can see the "unallocated" gap created by Windows Disk Manager.
Remember the earlier warning, a 32GB drive is too small. That's
the size in the Mele, and the author found that although Windows
10 works in 20GB, it is insufficient for updates. Cannot install
big apps either.
Now, what we need to do is create two partitions. The first will be a small partition with a vfat filesystem -- this is required for booting, and we will know it as the "boot partition". OK, let's do it...
Creating a vfat boot partition
In the original case study in 2019, a 640MB fat32 partition was created; however, it can be much smaller. 8MB is enough, and in that case it will have to be a fat12 filesystem. If you make the partition bigger, say 16MB, then it can have a fat16 filesystem
fat12, fat16, fat32; these are various forms of the vfat filesystem. fat12 is the oldest, used in floppy disks. It doesn't matter which one you use. If the partition is only 8MB, then you have to use fat12, as it is insufficient space to create a fat16 or fat32 filesystem.
In the GParted window:Right-click on "unallocated"
choose "New"
Then you will see this window, and fill in the parameters appropriately:
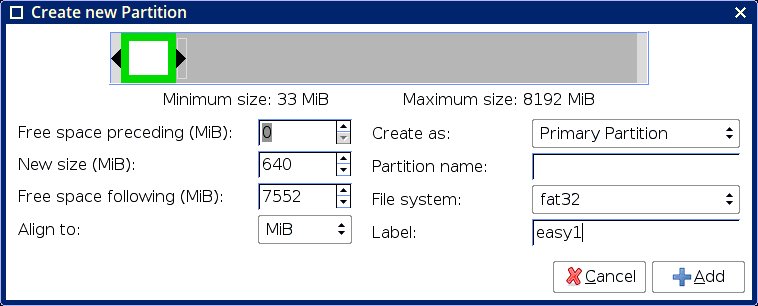
...and give it a suitable label, in this case "easy1".
And here it is:
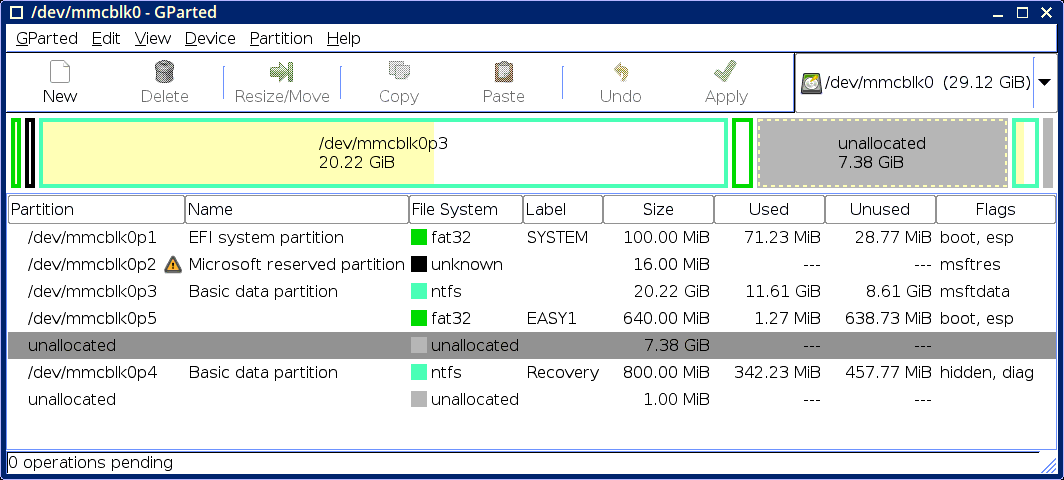
There is one more thing to do, to make "mmcblk0p5" bootable:
Right-click on "/dev/mmcblk0p5"
choose "Manage flags"
tick "esp" and "boot"
Bootable partition created!
That's for booting-up. However, the partition where EasyOS is installed, is going to be another one, and we will know this as the "working-partition".
Creating a ext4 working partition
Basically the same procedure as before:
Right-click on "unallocated"
    choose "New"
And fill in as appropriate. In this case, leave the size as-is, which will fill all available space, choose "ext4" filesystem, and type in a label, for example "easy2":

You are finished with GParted, exit from it. There is something
that you should check, just in case:
Wrong block size (March 19, 2020)
Author's note: I purchased a 8TB hard drive for a new computer, and split it into several partitions using GParted. GParted created the largest partition, about 6.2TB, with a block size of 4096 bytes, however created some 48GB partitions with block size of 1024 bytes. This is wrong, it should be 4096. Actually, GParted calls the 'mkfs.ext4' utility, which is what gets it wrong. This is a very unusual error, and I went through the exercise of recreating all the partitions, and this time they all had block size of 4096 -- very odd indeed!
Anyway, you should check. For the newly-created ext4 partition, run this (example of /dev/sda4):
# tune2fs -l /dev/sda4...that "-l" is the lower-case letter. It should output "Block size: 4096". If it doesn't, recreate the ext4 filesystem like this:
# mkfs.ext4 -b 4096 -m 0 /dev/sda4Then you are good-to-go!
However, there is one little hiccup. GParted does not support fine-tuning some ext4 settings. It is a pity, but we have to do this manually. Not essential, but recommended:
|
There are two recommended tweaks
that can be made to the ext4 filesystem:
Open a terminal and run this: # tune2fs -O encrypt,^has_journal /dev/mmcblk0p6 Or, to disable journal only: # tune2fs -O ^has_journal /dev/mmcblk0p6 |
Note that "-O" is a capital-letter. If you want to, you can paste the above command into a terminal window -- drag to highlight it, then click the middle-mouse-button in the terminal -- this is the standard Linux method for pasting any highlighted text, works in all apps.
Note that you do not have to disable the ext4 journal. If
the ext4 partition is being used for something else, say another
Linux distribution, then likely you would want to leave the
journal enabled. Anyway, EasyOS defaults to running in RAM, so
minimizing writes to the drive, so it is not a big deal if the
journal is left enabled.
Warning about GRUB bootloader
If your computer already has GRUB installed, or you intend to install GRUB, please be sure it is not a too-old version.
GRUB v1, GRUB4DOS, and GRUB v2 prior to version 2.0.4 (released 2019), do not recognise an ext4 filesystem if it has modern features such as the "encrypt" feature turned on. You can still use them; however, do not enable the encrypt feature of ext4. So, the feature of EasyOS to encrypt some folders in the working-partition will not be available. Folder encryption is a security protection if someone steals your computer, or whatever media EasyOS is installed on. You will have to forgo that extra protection.
If EasyOS is the only occupant of the partition, and it is an
SSD, after weighing up the factors, it is probably best choice to
disable the journal.
Nor do you need to enable encryption, not now anyway. At first
bootup of the installed EasyOS, it will see if encryption is
disabled and will offer to enable it. It is OK to enable
encryption if the partition is being shared with something else,
as the encryption mechanism only works on a per-folder basis.
Almost there! Just need to populate the partitions...
Populating the partitions
To make the new esp partition bootable and bootup EasyOS, it needs to have file /EFI/BOOT/BOOTX64.EFI
If you press the hot-key at power-on to launch UEFI-Setup, it will recognize existence of that file, and will offer it as a boot choice. You can set it as the default.
Where to get 'BOOTX64.EFI'? It is in the USB-stick. Well, that was originally the downloaded image file, that you can click on to open up.
So, a choice, where to get BOOTX64.EFI from. Click on the image file (ex: easy-7.2.4-amd64.img), and it will open up and you will see two windows. OK, doing that now to show you:
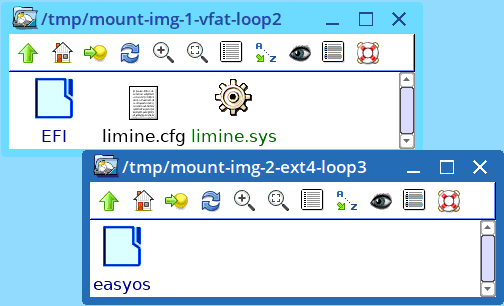
Drag to copy, the 'EFI' folder and file 'limine.conf' to the new
vfat esp partition. This has EFI/BOOT/BOOTX64.EFI
Also drag to copy, the 'easyos' folder to the new ext4 partition. This has files vmlinuz, initrd and easy.sfs.
What you have done is not only install EasyOS, you have also installed the Limine bootloader. Limine is actually contained in that 'BOOTX64.EFI' file, and that file 'limine.cfg' is for specifying a boot menu. Good idea for a heading here, as now describing Limine...
Limine bootloader
Yes, 'BOOTX64.EFI' is part of Limine, in this case. In EasyOS,
you can also find it at /usr/share/limine
Don't bother to copy 'limine-bios.sys', that is for booting on
BIOS computers. But, when 'BOOTX64.EFI' executes, it will look for
'limine.conf', so that must exist.
At this point, you are ready to go. Just one more thing; 'limine.conf' needs to be edited. Here is an example:
quiet: no
timeout: 20
graphics: no
default_entry: 1
editor_enabled: yes
interface_branding: EasyOS Limine Boot Manager
interface_resolution: 800x600

/EasyOS Excalibur (partition mmcblk0p6, path easyos)
    comment: EasyOS bootup
    resolution: 800x600
    protocol: linux
    kernel_cmdline: rw intel_iommu=igfx_off wkg_uuid=41e4e492-f6a0-11ec-9a02-287fcfeb4376 wkg_dir=easyos
    kernel_path: guid(4f6eb88d-aae3-485b-ac03-aaaabdd75a1e):/easyos/vmlinuz
    module_path: guid(4f6eb88d-aae3-485b-ac03-aaaabdd75a1e):/easyos/initrd

/Windows 10
    comment: Windows bootup
    resolution: 800x600
    protocol: efi_chainload
    image_path: guid(09ddd6ad-80b0-4265-8d7f-1621eb5a4d9f):/EFI/Microsoft/Boot/bootmgfw.efi
...note, that "intel_iommu=igfx_off" fixes the video with some
Intel GPUs.
That "wkg_uuid" parameter can be obtained by the 'blkid' utility:
# blkid /dev/mmcblk0p6
/dev/mmcblk0p6: LABEL="easy2" UUID="41e4e492-f6a0-11ec-9a02-287fcfeb4376" BLOCK_SIZE="4096" TYPE="ext4" PARTUUID="4f6eb88d-aae3-485b-ac03-aaaabdd75a1e"
That "guid" parameter is the "PARTUUID". For example, for the Windows partition:
# blkid /dev/mmcblk0p1
/dev/mmcblk0p1: LABEL="SYSTEM" UUID="5A85-A404" BLOCK_SIZE="512" TYPE="vfat" PARTLABEL="EFI system partition" PARTUUID="09ddd6ad-80b0-4265-8d7f-1621eb5a4d9f"
Yes, UUID and PARTUUID are two different things; UUID is the ID
of the filesystem in the partition, PARTUUID is the ID of the
partition.
However, if you are new to configuring Limine, there is good news; 'limine.conf' can be automatically generated. In the "Setup" menu, you will find "Limine Installer". Run that, follow the simple GUI windows, and you will get a 'limine.conf' generated.
Note: some earlier documentation refers to "limine.cfg'; that is
for older versions of Limine, and has a slightly different syntax.
If you want to read more about Limine, see this overview page:
https://easyos.org/install/limine-bootloader.html
Limine is not the only choice of bootloader. The mainstream distributions use GRUB2. Another choice is rEFInd...
rEFInd bootloader
Limine (and GRUB2) will work on both BIOS and UEFI computers,
rEFInd will only work on UEFI computers. It is simple to setup.
rEFInd is not installed builtin in the Excalibur-series of
EasyOS, but is readily installed via the PKGget package manager.
You will need to read the documentation and find the appropriate .efi file, that may be copied and renamed to /EFI/BOOT/BOOTX64.EFI, same as explained for Limine. In this case. /EFI/BOOT/refind.conf is required, to specify a menu.
A tutorial has been written describing use of rEFInd (however, a bit old):
https://easyos.org/install/install-to-pc-with-existing-refind-boot-manager.html
The only thing remaining is to run UEFI-Setup at power-on...
Booting Easy
So, how do we boot EasyOS, for the very first time? The answer is to run UEFI-Setup. Power-on, holding down the hot-key (ESC key on the Mele), then select whether to boot the from the Windows esp partition or the EasyOS esp partition.
Choose the EasyOS esp partition, and you will then get the Limine menu. This will be the default for future bootups.
Postamble
There could be a GUI installer, but the manual steps described in
this page are pretty simple. Besides, there is a certain
satisfaction doing it yourself and having complete control over
every step.
Have fun!
A disclaimer: Barry Kauler has provided these instructions in good faith, however there is a disclaimer of all responsibility if something does go wrong. It shouldn't, but if you type in something incorrectly and wipe your C: drive, that is entirely your own responsibility. if you are a Linux newbie and want to install Easy on the internal hard drive, it is recommended that you find a Linux-knowledgeable guy to help.
Tags: install